I decided to finish the last 2 pieces of my Summer wardrobe:
I haven't gotten to the dress, yet, but I sewed the skirt on Tuesday night. I used New Look 6107 (I added cutaway pockets, but sewed everything else with just my regular petite and hourglass adjustments).
Here's my simple little skirt--don't mind the pic as it's draped over a hanger, and hadn't been pressed, yet:
It's made of the same fabric as my yellow peplum top, which means that when I wear it with that top, I'll have a two piece dress!
The yellow and white printed pique dress will be up right after I finish sewing this OOP New Look 6468 emerald green top (see board on the side bar to the left):
I'm almost done:
Make this day a good one!
Showing posts with label New Look. Show all posts
Thursday, August 2, 2012
Thursday, July 5, 2012
Drafting A Bodice Like the One From New Look 6067
I really like the dart treatment on the bodice of New Look 6067. It is a throwback to the elegant forties if I ever saw one--the darts, but not the dress, as the dress has a modern silhouette. Back in the 40s, they loved beautiful design elements like those chevron darts.
But I am a proportioned petite and shortening that bodice had nightmare written all over it.
Why? Because of the chevron darts.
If I shortened the bodice, it would throw off the spacing between the darts, it would change the length of the darts, and it would mess up the actual functioning dart itself!
After folding out enough length so it would fit me lengthwise, I'd have to go back and fix ALL of the above. I was not about to bother with any of it!
Instead, I decided to draft my own pattern. I haven't drafted anything in a while, but that didn't stop me. Ohh nooo! Not at all! I fearlessly plowed on! :-)
The first thing I did was to gather up my supplies:
1. tissue from a pattern that I was never going to use
2. scissors for paper
3. glue stick
4. ruler
5 Sharpie
6. pencil
7. pins
I set them out on the table and then I picked a basic TNT to use as my base--that would be vintage Simplicity 3994:
Here's the bodice piece:
I traced the bodice piece already adjusted to fit me, on pattern tissue that I was never going to use--might as well put it to good use! :-)
On the traced pattern piece, I moved the side dart to the waist and combined it with the waist dart--you can actually see the side dart folded out and the waist dart opened up:
And then I turned my attention to creating the center front chevron darts. I wanted the first dart to be the functional dart. The other two were only going to be decorative darts.
At first, I did it all wrong! I marked where I wanted the center front darts to go, but when creating them, I cut them open from the center front to the other edge.
It created an unexpected pouf. That was never going to work, so I thought about it some more. I decided to cut the first dart open to the bust point, and cut the others to a point that would work design-wise. It turned out perfectly!
Here's the final--note that I glued tissue over the darts that I cut open. I also trued the slightly arcing waist line:
Here's the pin fitted sample (this is what made it apparent to me that I needed to true the waist line):
Here's a close up of the dart treatment:
It took me around 1 1/2 - 2 hours to do all of that drafting. It required concentration and focusing, and was actually fun! I actually enjoyed drafting again! It was a thousand times more interesting than simply altering a pattern. And it was quicker, too. If I had chosen to alter 6067, it would have taken me much longer than that.
I would say that my time drafting was time very well spent. I'm planning to use the pattern that I just drafted to make a nice navy blue dress--the fabric's from my stash. I'm sewing it right after I finish my Sunshiny Day 6 pak.
The next drafting project that I'm thinking about tackling is New Look 6000, the dress with the side waist radiants. That is another design that would be easier to redraft than to shorten at the waist.
Make this day a good one!
But I am a proportioned petite and shortening that bodice had nightmare written all over it.
Why? Because of the chevron darts.
If I shortened the bodice, it would throw off the spacing between the darts, it would change the length of the darts, and it would mess up the actual functioning dart itself!
After folding out enough length so it would fit me lengthwise, I'd have to go back and fix ALL of the above. I was not about to bother with any of it!
Instead, I decided to draft my own pattern. I haven't drafted anything in a while, but that didn't stop me. Ohh nooo! Not at all! I fearlessly plowed on! :-)
The first thing I did was to gather up my supplies:
1. tissue from a pattern that I was never going to use
2. scissors for paper
3. glue stick
4. ruler
5 Sharpie
6. pencil
7. pins
I set them out on the table and then I picked a basic TNT to use as my base--that would be vintage Simplicity 3994:
Here's the bodice piece:
I traced the bodice piece already adjusted to fit me, on pattern tissue that I was never going to use--might as well put it to good use! :-)
On the traced pattern piece, I moved the side dart to the waist and combined it with the waist dart--you can actually see the side dart folded out and the waist dart opened up:
And then I turned my attention to creating the center front chevron darts. I wanted the first dart to be the functional dart. The other two were only going to be decorative darts.
At first, I did it all wrong! I marked where I wanted the center front darts to go, but when creating them, I cut them open from the center front to the other edge.
It created an unexpected pouf. That was never going to work, so I thought about it some more. I decided to cut the first dart open to the bust point, and cut the others to a point that would work design-wise. It turned out perfectly!
Here's the final--note that I glued tissue over the darts that I cut open. I also trued the slightly arcing waist line:
Here's the pin fitted sample (this is what made it apparent to me that I needed to true the waist line):
Here's a close up of the dart treatment:
It took me around 1 1/2 - 2 hours to do all of that drafting. It required concentration and focusing, and was actually fun! I actually enjoyed drafting again! It was a thousand times more interesting than simply altering a pattern. And it was quicker, too. If I had chosen to alter 6067, it would have taken me much longer than that.
I would say that my time drafting was time very well spent. I'm planning to use the pattern that I just drafted to make a nice navy blue dress--the fabric's from my stash. I'm sewing it right after I finish my Sunshiny Day 6 pak.
The next drafting project that I'm thinking about tackling is New Look 6000, the dress with the side waist radiants. That is another design that would be easier to redraft than to shorten at the waist.
Make this day a good one!
Tuesday, July 3, 2012
New Look 6080 - Beige Jacquard Bolero with Collar
I love boleros, but I haven't had one my wardrobe in a while. When I saw New Look 6080, I knew it was definitely time to make one. I originally planned for this to be part of my earlier unnamed 6 pak--the one with the aqua top.
What hooked me on this particular pattern is the collar. The surprise element about it is that it looks like a shawl collar, but it actually isn't. The collar is a separate piece.
Here's my bolero:
I sewed my usual size, which is a 6. The size 6 bolero is drafted to be 15.5 inches long. I'm a proportioned petite, and shortened it because my boleros need to be a little shorter than that. I also shortened the collar and front facing by the same amount so the pattern pieces would match.
If you are a proportioned petite, be sure to check the length if you sew this. A bolero isn't a bolero unless it's bolero length. Boleros that are too long look awful on those of us who are proportioned petites.
The fabric that I used is a stretch beige/sand floral jacquard.
I've sewn with stretch wovens many times, and always interfaced them. I often didn't like the way what I made turned out with interfacing. It had too much body with some types of interfacing, while it was like not having any interfacing at all with the softer types.
This time, I embarked on a grand experiment! I sewed this like I would a knit. I sewed it without any interfacing!
I always stabilize the shoulders on my knits with cotton twill tape--I did that here, too. If there's one thing I can't stand, it's shoulders that stretch!
I haven't worn my bolero yet, so I can't say if my experiment was a success or a bust! I'll come back and revise this post when I know.
Oh, one more thing! I raised the armholes on this, and raised the sleeves accordingly, but when I sewed the sleeves on, I had more sleeve than armhole. I had to make adjustments to make it work.
The mis-match might have been due to the draft of the pattern, or it could have been due to operator error--not sure. If you sew this, check the sleeve against the armhole before you cut.
After completing the bolero, I realized that it didn't really look good with the aqua and white tops that I made this to wear with. When paired with a beige top that I made a few years ago, though, it created a monochromatic look that works for me. The pairing is very versatile--it will work with jeans for a casual look, and with a skirt for a stepped up look:
Oh, and about the RTW pieces that I tossed--before actually getting them out of here, I retrieved a few that I thought I could re-work to be flattering enough for me to actually enjoy wearing. Here are 2 that apart, no longer work for me, but together, they make a very wearable casual outfit. I will definitely be wearing this with jeans during the Fall:
It's only July, but I'm already thinking ahead!
Up next is the peplum top from my Sunshiny Day 6 pak. Vogue 8815's version of the peplum top is popping up all over the place in sewing blogland--I am definitely on that bandwagon! But I'm sewing New Look 6130 first because I really like the asymmetrical hemline!
That's it for now!
Make this day a good one!
What hooked me on this particular pattern is the collar. The surprise element about it is that it looks like a shawl collar, but it actually isn't. The collar is a separate piece.
Here's my bolero:
I sewed my usual size, which is a 6. The size 6 bolero is drafted to be 15.5 inches long. I'm a proportioned petite, and shortened it because my boleros need to be a little shorter than that. I also shortened the collar and front facing by the same amount so the pattern pieces would match.
If you are a proportioned petite, be sure to check the length if you sew this. A bolero isn't a bolero unless it's bolero length. Boleros that are too long look awful on those of us who are proportioned petites.
The fabric that I used is a stretch beige/sand floral jacquard.
I've sewn with stretch wovens many times, and always interfaced them. I often didn't like the way what I made turned out with interfacing. It had too much body with some types of interfacing, while it was like not having any interfacing at all with the softer types.
This time, I embarked on a grand experiment! I sewed this like I would a knit. I sewed it without any interfacing!
I always stabilize the shoulders on my knits with cotton twill tape--I did that here, too. If there's one thing I can't stand, it's shoulders that stretch!
I haven't worn my bolero yet, so I can't say if my experiment was a success or a bust! I'll come back and revise this post when I know.
Oh, one more thing! I raised the armholes on this, and raised the sleeves accordingly, but when I sewed the sleeves on, I had more sleeve than armhole. I had to make adjustments to make it work.
The mis-match might have been due to the draft of the pattern, or it could have been due to operator error--not sure. If you sew this, check the sleeve against the armhole before you cut.
After completing the bolero, I realized that it didn't really look good with the aqua and white tops that I made this to wear with. When paired with a beige top that I made a few years ago, though, it created a monochromatic look that works for me. The pairing is very versatile--it will work with jeans for a casual look, and with a skirt for a stepped up look:
Oh, and about the RTW pieces that I tossed--before actually getting them out of here, I retrieved a few that I thought I could re-work to be flattering enough for me to actually enjoy wearing. Here are 2 that apart, no longer work for me, but together, they make a very wearable casual outfit. I will definitely be wearing this with jeans during the Fall:
It's only July, but I'm already thinking ahead!
Up next is the peplum top from my Sunshiny Day 6 pak. Vogue 8815's version of the peplum top is popping up all over the place in sewing blogland--I am definitely on that bandwagon! But I'm sewing New Look 6130 first because I really like the asymmetrical hemline!
That's it for now!
Make this day a good one!
Thursday, June 21, 2012
New Look 6107 - Adjusted to have a slightly higher neckline
When I made New Look 6107, I raised the neckline by 2 inches. I thought that would be more than enough, but when I wanted to wear it, it felt a teeny bit too low to wear comfortably.
Here's the pattern again:
I had no choice but to raise the neckline. I could have done it with a modesty panel, but it would have looked too obvious. I could have added ruffles, but it would have required a LOT of undoing and redoing of seams.
What I did instead, was to add self fabric flowers around the neckline--4 on each side! It raised the neckline by around one more inch. It's amazing what a few flowers can do! It is now perfect for me!
Here it is:
When I sew it again, I'll raise the neckline by a total of 3 inches, so I won't have to futz with it later.
Make this day a good one!
Here's the pattern again:
I had no choice but to raise the neckline. I could have done it with a modesty panel, but it would have looked too obvious. I could have added ruffles, but it would have required a LOT of undoing and redoing of seams.
What I did instead, was to add self fabric flowers around the neckline--4 on each side! It raised the neckline by around one more inch. It's amazing what a few flowers can do! It is now perfect for me!
Here it is:
When I sew it again, I'll raise the neckline by a total of 3 inches, so I won't have to futz with it later.
Make this day a good one!
Monday, June 18, 2012
New Look 6107 - Aqua Top - Done!!!
Today, I finished New Look 6107:
I used gold buttons because I like for my clothes, even my casual basics, to have a polished look.
Up next is that black-yellow-white print that I kept picturing as a skirt. I decided not to make the sleeveless top from New Look 6104. The pattern starts at size 10 and even if I like the style, I don't want to bother with grading it down to a 6.
Instead, I'm using an OOP pattern from my stash to make a fitted and flared top--it's the top at the very bottom of the pattern pic:
After that, I don't know what I'll be working on. I wanted some inspiration, so I looked at Modcloth.com.
Here are two of their tops that I'm thinking about knocking off:
Make this day a good one!
What I really like about it is that it is a great basic! It might be basic in style, but the button and loop closures take the style up a notch! I also like that it has a modesty panel for the front opening.
I used a washed aqua silk shantung. I'm soo glad I washed it before sewing with it, as several flaws in the fabric became evident after it was washed and dried. Luckily, I had enough of the fabric so I could cut around the flaws.
I am petite and usually cut a size 6 with hourglass and petite adjustments. This started at an 8, so I graded it down a little. I also made my usual hourglass and petite adjustments. I took it in at the waist and took it out at the hips. I raised the waist and shortened it at the hem by 2 inches--as is, this top is pretty long. Oh, and as is, the neckline is super low! I raised it by a whopping 2 inches!!!
As far as construction is concerned, instead of machine stitching the bias finishes down, I hand stitched them. Hand stitching gives it a nearly invisible finish, and I like that.
I really like this top--aqua is one of my very fave colors! I'm going to get a lot of wear out of this because it's soo basic:
Instead, I'm using an OOP pattern from my stash to make a fitted and flared top--it's the top at the very bottom of the pattern pic:
I can totally see it in my minds' eye, and can't wait to sew it!
After that, I don't know what I'll be working on. I wanted some inspiration, so I looked at Modcloth.com.
Here are two of their tops that I'm thinking about knocking off:
Make this day a good one!
Labels:
6107,
aqua,
gold buttons,
modcloth,
New Look,
silk shantung,
top
Saturday, June 16, 2012
New Look 6170 - Red Eyelet Top - Done!
After wearing almost exclusively RTW for much too long (over 6 months!!!), I was determined to sew something for myself asap! I am really looking forward to having a sewn-by-me wardrobe again.
I wanted a breezy woven summer top, so first up was New Look 6127:
I am usually a size 6 petite, but I cut a straight size 6 for this. I shortened the straps to fit. I also shortened the top's length by 2 inches.
The sizing on this pattern is true--it fits exactly how I expected it to fit.
When putting it together, I didn't follow the instructions to machine stitch the bias bindings in place. I hand sewed them down instead. The hand stitching is invisible and makes for a more polished finish.
This was super easy to sew. Even with the time it took to do the hand sewing, it only took around 3 hours to complete.
OH! Look at how cute it is!!!
I used a red eyelet and lined it with a lightweight broadcloth in a matching red.
At first, I was a little trepidatious about the loose fitting style, but my worries were for naught! I like the way this fits and looks! I'm planning to wear it with white, khaki, and jeans shorts! It is THE perfect summer top!!!!
The only thing that I don't really like about this is that the top is drafted so that the straps are sewn on sideways. When worn, it lays flat and is fine, but it just looks a little weird like that when it's on the hanger. When I sew this again, I am going to sew the straps on the conventional way.
Other than that, I really like this and will probably make another one with some sort of summer print in a bright summer color. :-)
Up next is a yellow peplum top from New Look 6130--peplums are all over the place and I am REALLY excited about this one!!!
I'm happily rolling along--it feels good to have the beginnings of a custom wardrobe again!
Be back soon!
Make this day a good one!
I wanted a breezy woven summer top, so first up was New Look 6127:
I am usually a size 6 petite, but I cut a straight size 6 for this. I shortened the straps to fit. I also shortened the top's length by 2 inches.
The sizing on this pattern is true--it fits exactly how I expected it to fit.
When putting it together, I didn't follow the instructions to machine stitch the bias bindings in place. I hand sewed them down instead. The hand stitching is invisible and makes for a more polished finish.
This was super easy to sew. Even with the time it took to do the hand sewing, it only took around 3 hours to complete.
OH! Look at how cute it is!!!
I used a red eyelet and lined it with a lightweight broadcloth in a matching red.
At first, I was a little trepidatious about the loose fitting style, but my worries were for naught! I like the way this fits and looks! I'm planning to wear it with white, khaki, and jeans shorts! It is THE perfect summer top!!!!
The only thing that I don't really like about this is that the top is drafted so that the straps are sewn on sideways. When worn, it lays flat and is fine, but it just looks a little weird like that when it's on the hanger. When I sew this again, I am going to sew the straps on the conventional way.
Other than that, I really like this and will probably make another one with some sort of summer print in a bright summer color. :-)
Up next is a yellow peplum top from New Look 6130--peplums are all over the place and I am REALLY excited about this one!!!
I'm happily rolling along--it feels good to have the beginnings of a custom wardrobe again!
Be back soon!
Make this day a good one!
Labels:
6170,
gold buttons,
New Look,
New Look 6170,
red eyelet
Saturday, August 28, 2010
New Look 6463 - A Simple Plaid Knit Skirt with a Flounce
I have wanted a plaid skirt with a draping flounce for what seems like forever, but somehow never got around to making one . . . until now. I made view E from New Look 6463:

I used fabric that was leftover from my last skirt and from the maxi that never was. Here's my skirt:

The fabric is perfect for this style. The flounce swishes very nicely. And this skirt was super easy to sew. Super fast, too--it took all of one hour. I sewed the skirt as is and it went together perfectly! The only thing I have to say about it is that view E is only 25 inches long. If you're going to make this skirt, be aware that it's much shorter than the skirt that the model is wearing in the pic on the envelope. Other than that, I have nothing to say because sewing this was problem-free--it was very easy.
I have several other projects to share, but haven 't had time to take pics, yet. As soon as I do, I'll post the pics.
I cut waay back on sewing, but it looks like it's picking up again. This weekend, I'm working on an aubergine dress suit--everything's from stash. On Saturday, I'm sewing all day from around 10 am on without interruption and hopefully, I'll be able to finish the set.
Enjoy the day,
Em

I used fabric that was leftover from my last skirt and from the maxi that never was. Here's my skirt:

The fabric is perfect for this style. The flounce swishes very nicely. And this skirt was super easy to sew. Super fast, too--it took all of one hour. I sewed the skirt as is and it went together perfectly! The only thing I have to say about it is that view E is only 25 inches long. If you're going to make this skirt, be aware that it's much shorter than the skirt that the model is wearing in the pic on the envelope. Other than that, I have nothing to say because sewing this was problem-free--it was very easy.
I have several other projects to share, but haven 't had time to take pics, yet. As soon as I do, I'll post the pics.
I cut waay back on sewing, but it looks like it's picking up again. This weekend, I'm working on an aubergine dress suit--everything's from stash. On Saturday, I'm sewing all day from around 10 am on without interruption and hopefully, I'll be able to finish the set.
Enjoy the day,
Em
Sunday, August 22, 2010
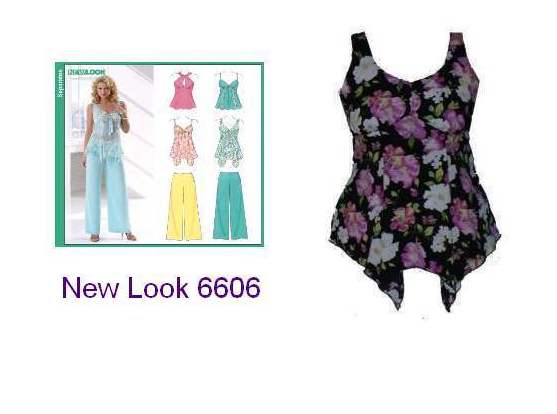
New Look 6606 - Fun top with the shaped hem!!!
Here's a pic of my New Look 6606 top with the shaped hem--it's on me with me cropped out:

Well, what can I say . . . only that I LOVE it!!! I knew I would!!! I'm so glad I did the style analysis for myself! If I hadn't, I might have been stuck with a kinda sorta like it, but not really top that lacked shaping. I would have wasted this rayon challis, which, by the way, I am absolutely mad about, AND I would have wasted precious time! Because of the simple analysis that I did, I avoided all of that!
Here's a heads up about this pattern--I raised the neckline because the bodice that I chose is drafted REALLY low!!! As an hourglass 8, I have learned not to wear low cut necklines. I don't know about other hourglass 8s, but because I'm shapely, I have found that wearing low cut necklines gets me the creepy type of attention that I don't want, and it can turn other women really snotty. I know non hourglass figure types who aren't the snotty type will probably think that this doesn't happen, but trust me, it does. Ask your hourglass friends and they will tell you.
Back to my point--some people love that type of attention and can deal with the jealousy, but I'd rather avoid all of that. I avoid the tooo buttoned up super modest look and I avoid the low cut look, too.
And about the points at the hem--to keep the points at the hem pointed, I simply serged the bottom (don't serge continuously around the point or you'll end up with rounded points), knotted the tail 3 times at the point before I cut the serged thread tail off, then put a drop of fray check right on the knot to secure it permanently. I took great care not to let the fray check get on anything but the knot by using a toothpick to do this.
I also used cotton twill tape as a stay at the front neckline. I used challis and I didn't want it to stretch when worn.
I finished several things from last weekend and this one--this top is from last week. I'll post pics of everything as I have time, so you can see how the pattern styles look when sewn.
I've also added a couple of skirts to my queue. Guess it's mini time! They're too cute, I tell you!!!
I don't know if the ruffled pockets will be unflattering to the hourglass 8 figure type, but I will find a way to make it work!!! :-)

And I want a fitted skirt with a paperbag waist just like this one--I'm going to make this one work, too:

BTW--BMV is having a huge one day only sale tomorrow. If you are on their email list, check your email. They are having a shop before noon discount that's in addition to their sale prices!
Hope you had a good weekend!
Em

Well, what can I say . . . only that I LOVE it!!! I knew I would!!! I'm so glad I did the style analysis for myself! If I hadn't, I might have been stuck with a kinda sorta like it, but not really top that lacked shaping. I would have wasted this rayon challis, which, by the way, I am absolutely mad about, AND I would have wasted precious time! Because of the simple analysis that I did, I avoided all of that!
Here's a heads up about this pattern--I raised the neckline because the bodice that I chose is drafted REALLY low!!! As an hourglass 8, I have learned not to wear low cut necklines. I don't know about other hourglass 8s, but because I'm shapely, I have found that wearing low cut necklines gets me the creepy type of attention that I don't want, and it can turn other women really snotty. I know non hourglass figure types who aren't the snotty type will probably think that this doesn't happen, but trust me, it does. Ask your hourglass friends and they will tell you.
Back to my point--some people love that type of attention and can deal with the jealousy, but I'd rather avoid all of that. I avoid the tooo buttoned up super modest look and I avoid the low cut look, too.
And about the points at the hem--to keep the points at the hem pointed, I simply serged the bottom (don't serge continuously around the point or you'll end up with rounded points), knotted the tail 3 times at the point before I cut the serged thread tail off, then put a drop of fray check right on the knot to secure it permanently. I took great care not to let the fray check get on anything but the knot by using a toothpick to do this.
I also used cotton twill tape as a stay at the front neckline. I used challis and I didn't want it to stretch when worn.
I finished several things from last weekend and this one--this top is from last week. I'll post pics of everything as I have time, so you can see how the pattern styles look when sewn.
I've also added a couple of skirts to my queue. Guess it's mini time! They're too cute, I tell you!!!
I don't know if the ruffled pockets will be unflattering to the hourglass 8 figure type, but I will find a way to make it work!!! :-)

And I want a fitted skirt with a paperbag waist just like this one--I'm going to make this one work, too:

BTW--BMV is having a huge one day only sale tomorrow. If you are on their email list, check your email. They are having a shop before noon discount that's in addition to their sale prices!
Hope you had a good weekend!
Em
Labels:
6606,
New Look,
rayon challis,
shaped hem,
top
Subscribe to:
Posts (Atom)